Post by eternity on Dec 22, 2015 0:38:50 GMT
emotool2 can be downloaded in the tools thread.
This tutorial is about the parts of emotool2 that can be done without the need of recompiling the program. As of current version, the main feature of emotool2 about transplanting parts between characters can only be accessed by coding, in the future I may be able to automatize it or at least simplify it by a lot, but at the moment it is like that.
As of version 0.0003, this is the list of things that emotool2 can be done without recompiling:
- Export a model to .obj format. The model is exported both fully in a single .obj file and as multiples .obj files per part (and subparts) in a folder.
- Partial support to inject .obj files. Like above, inject can happen by parts or by full model.
The inject feature have following limitations: the .obj files can only contain the same number of vertex than the existing ones in the .emo. The vertex shouldn't be reordered by your 3d editor (to acomplish this, they must be imported and exported with special settings; settings for blender and 3ds max are shown in this tutorial).
Probably editing uvmap will not work... but you can always test.
- Extracting .emb files (usually they contain dds textures, but this is not the case always)
- Inserting files back to .emb files.
- Showing basic info abourt parts.
- Showing basic info about skeleton (.emo and .ema supported here)
- Hiding parts.
The tutorial will only cover, for now, the export/reinject of .obj, and .emb files. The other parts are identical to original emotool, and the tutorial about hiding a part of a character covers those.
------------
Exporting .obj from an .emo file:
Well, this is easy, just copy your .emo file to the directory where emotool2 is, and drag and drop to the export_obj.bat.
This will output a file with same name as your emo but with obj extension (this is the full model), and also a folder called XXX_exported (where XXX is the base name of your .emo), which will contain a lot of .obj files, one for each part.
Later, when injecting, you can choose between injecting the full model or injecting specific parts (more to that later)
Importing and re-exporting .obj files in 3ds Max and Blender
Let me be clear at this point: it is VERY IMPORTANT that you follow this procedure properly. And you have to follow it in both, the import and (re)export process, otherwise don't expect the re-injected part to work at all (even if it didn't give an error in emotool2, it wouldn't work in game).
If you just want to preview a model without midifying it, it is fine if you use default settings of your program.
Importing in 3ds max:
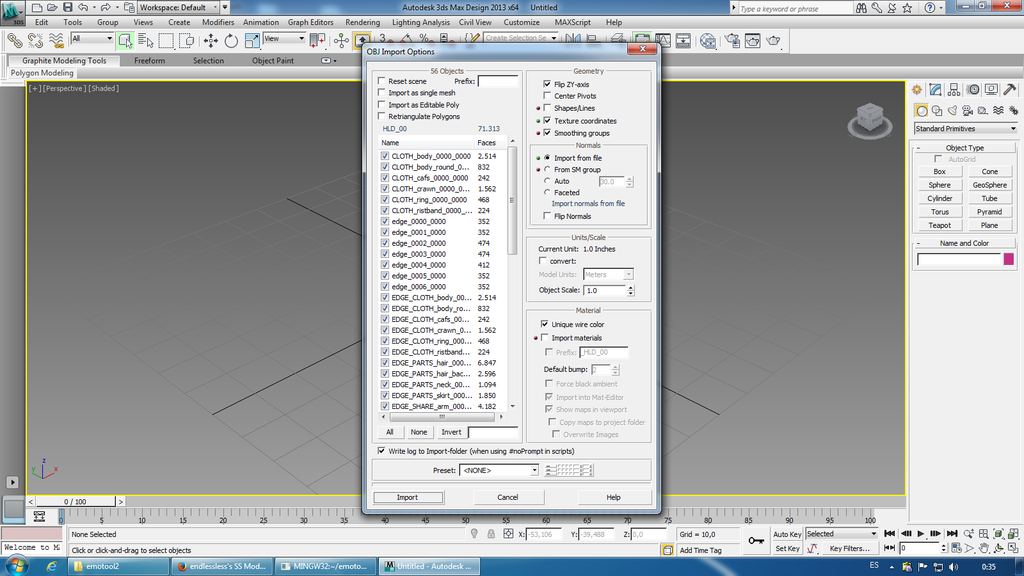
When importing .obj, use exactly settings as shown in this image. This screenshot is from 2013 version... hopefully it won't be very different in other versions.
(specially important are flip zy axis checked, and the "retriangulate polygons" unchecked, but when in doubt just use all those settings exactly)

Exporting in 3ds max:
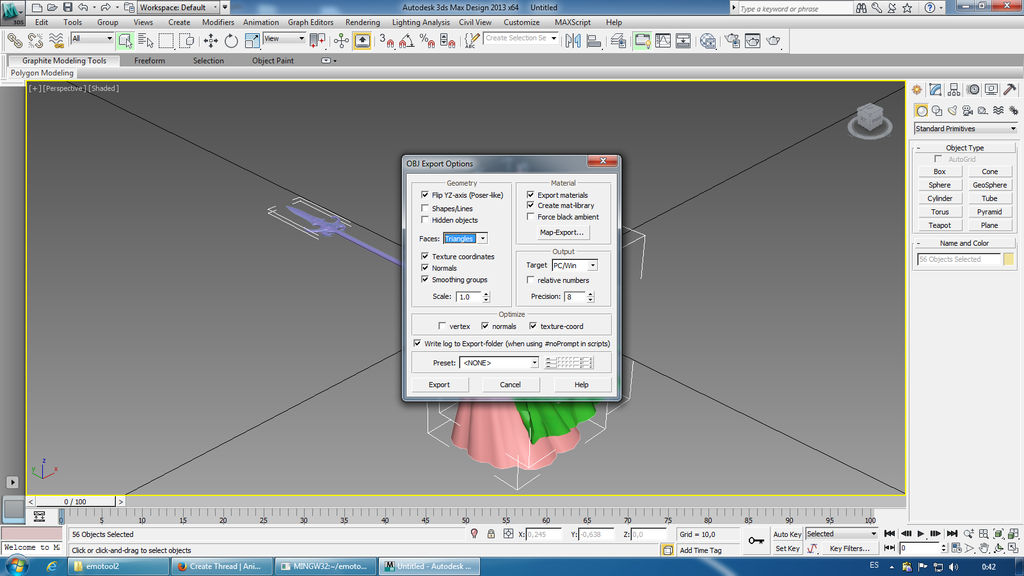
(Re)exporting: when you have finished edit, use these settings to export:
(specially important the flip axis checked and optimize vertex unchecked, the other two ones probably should remain checked or there is the risk that they bypass the number of vertex, which emotool2 wouldn't support, scale 1.0, faces -> triangles... well, when in doubt just leave it like in the image)

Importing in Blender
I'm using 2.76 as example, hopefully it is the same in other versions.
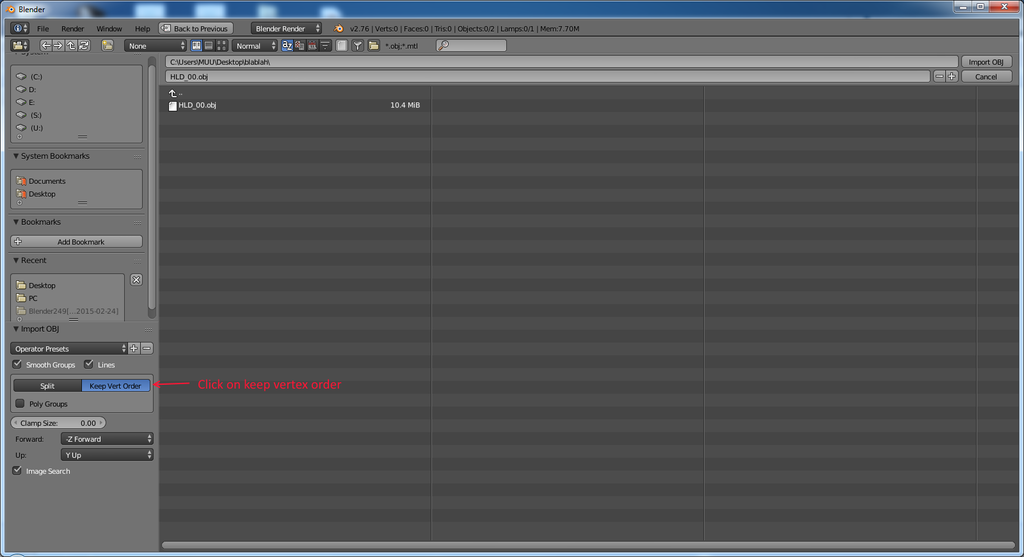
From the default settings, you only have to change one: you have to click on "Keep vertex order" to select it (make sure "background" of the button is blue).
Like in this image:

Unfortunately, this doesn't come without a cost. When you do a "Keep vertex order", the parts separation of the model will be destroyed. That means you want be able to select the separated parts of the model like they are in the game. It sucks but if you don't do this, the vertex will be reordered forever (and the keep vertex at export wouldn't magically fix it)
The only workaround to have both, objects separation and vertex order at the same time is... to use 3ds max
Exporting in Blender:
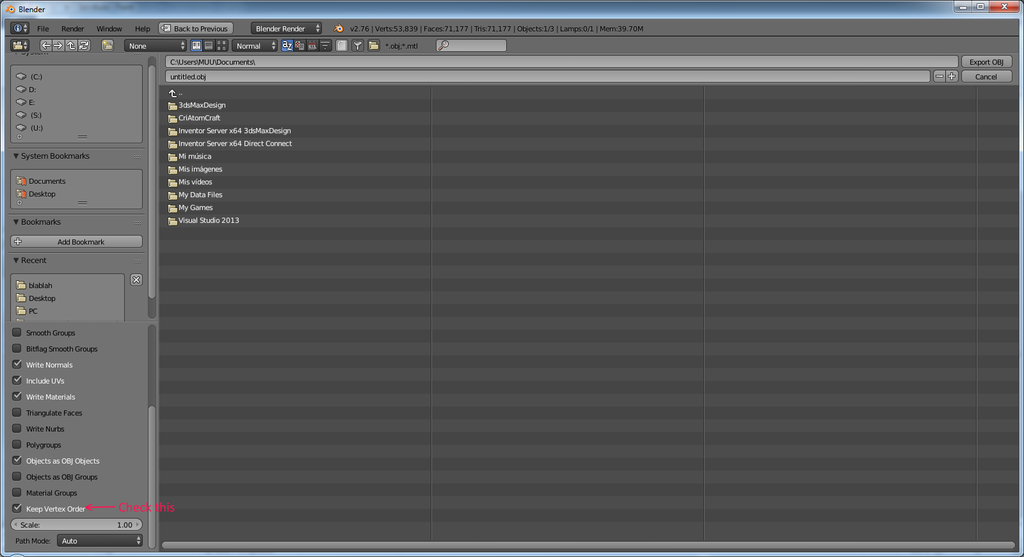
You have to check "Keep vertex order" again. This time it doesn't come as a button but as a checkbox which is at the very end (and which is easy to miss if you don't scroll down).

Injecting .obj back to .emo
Emotool2 supports two ways of injecting an .obj into a .emo: injecting the full model, or injecting only the specific parts you want.
To inject a full model, just drag and drop the .obj file to inject_obj.bat. The program will deduce that an .emo file with similar base name exists and which is the one where the .obj will be injected (if no problem happens, that's it).
To inject one or more specific parts, you have to create a folder called "XXX_work", where XXX is the base name of the .emo: for example, HLD_00.emo -> HLD_00_work
And put your parts .obj there, with the same naming convention as they are were exported by emotool2. Usually, when working with parts, you just would import .obj files from the XXX_exported folder to your 3d editor program, and when you are finished export with same name to XXX_work folder instead. XXX_work folder will contain only the parts that you are modifying (if you were to inject all parts, the inject process would be equivalent to that of injecting the full model).
So, ummm, just drag and drop the folder XXX_work to inject_obj.bat, and the program will inject any part that it finds in the folder, to XXX.emo.
-------
(TODO: add part about extracting and injecting .emb, I will do that tomorrow)
--------
And that's all for now. What a wall of text.
Anyway, since at this point, the inject feature of emotool2 is probably very basic, I would need the collaboration of any graphics designer to continue developing it, since I totally suck at that.
Essentially I need people to test model edits injected with emotool2 and posting results (you should have followed the tutorial properly about importing/exporting .obj files in the editor programs, otherwise the results of tests would be useless).
And when possible, providing me models in both, the exported .obj that failed, and in the native format of blender/3ds max, so that I can experiment.
This tutorial is about the parts of emotool2 that can be done without the need of recompiling the program. As of current version, the main feature of emotool2 about transplanting parts between characters can only be accessed by coding, in the future I may be able to automatize it or at least simplify it by a lot, but at the moment it is like that.
As of version 0.0003, this is the list of things that emotool2 can be done without recompiling:
- Export a model to .obj format. The model is exported both fully in a single .obj file and as multiples .obj files per part (and subparts) in a folder.
- Partial support to inject .obj files. Like above, inject can happen by parts or by full model.
The inject feature have following limitations: the .obj files can only contain the same number of vertex than the existing ones in the .emo. The vertex shouldn't be reordered by your 3d editor (to acomplish this, they must be imported and exported with special settings; settings for blender and 3ds max are shown in this tutorial).
Probably editing uvmap will not work... but you can always test.
- Extracting .emb files (usually they contain dds textures, but this is not the case always)
- Inserting files back to .emb files.
- Showing basic info abourt parts.
- Showing basic info about skeleton (.emo and .ema supported here)
- Hiding parts.
The tutorial will only cover, for now, the export/reinject of .obj, and .emb files. The other parts are identical to original emotool, and the tutorial about hiding a part of a character covers those.
------------
Exporting .obj from an .emo file:
Well, this is easy, just copy your .emo file to the directory where emotool2 is, and drag and drop to the export_obj.bat.
This will output a file with same name as your emo but with obj extension (this is the full model), and also a folder called XXX_exported (where XXX is the base name of your .emo), which will contain a lot of .obj files, one for each part.
Later, when injecting, you can choose between injecting the full model or injecting specific parts (more to that later)
Importing and re-exporting .obj files in 3ds Max and Blender
Let me be clear at this point: it is VERY IMPORTANT that you follow this procedure properly. And you have to follow it in both, the import and (re)export process, otherwise don't expect the re-injected part to work at all (even if it didn't give an error in emotool2, it wouldn't work in game).
If you just want to preview a model without midifying it, it is fine if you use default settings of your program.
Importing in 3ds max:
When importing .obj, use exactly settings as shown in this image. This screenshot is from 2013 version... hopefully it won't be very different in other versions.
(specially important are flip zy axis checked, and the "retriangulate polygons" unchecked, but when in doubt just use all those settings exactly)

Exporting in 3ds max:
(Re)exporting: when you have finished edit, use these settings to export:
(specially important the flip axis checked and optimize vertex unchecked, the other two ones probably should remain checked or there is the risk that they bypass the number of vertex, which emotool2 wouldn't support, scale 1.0, faces -> triangles... well, when in doubt just leave it like in the image)

Importing in Blender
I'm using 2.76 as example, hopefully it is the same in other versions.
From the default settings, you only have to change one: you have to click on "Keep vertex order" to select it (make sure "background" of the button is blue).
Like in this image:

Unfortunately, this doesn't come without a cost. When you do a "Keep vertex order", the parts separation of the model will be destroyed. That means you want be able to select the separated parts of the model like they are in the game. It sucks but if you don't do this, the vertex will be reordered forever (and the keep vertex at export wouldn't magically fix it)
The only workaround to have both, objects separation and vertex order at the same time is... to use 3ds max

Exporting in Blender:
You have to check "Keep vertex order" again. This time it doesn't come as a button but as a checkbox which is at the very end (and which is easy to miss if you don't scroll down).

Injecting .obj back to .emo
Emotool2 supports two ways of injecting an .obj into a .emo: injecting the full model, or injecting only the specific parts you want.
To inject a full model, just drag and drop the .obj file to inject_obj.bat. The program will deduce that an .emo file with similar base name exists and which is the one where the .obj will be injected (if no problem happens, that's it).
To inject one or more specific parts, you have to create a folder called "XXX_work", where XXX is the base name of the .emo: for example, HLD_00.emo -> HLD_00_work
And put your parts .obj there, with the same naming convention as they are were exported by emotool2. Usually, when working with parts, you just would import .obj files from the XXX_exported folder to your 3d editor program, and when you are finished export with same name to XXX_work folder instead. XXX_work folder will contain only the parts that you are modifying (if you were to inject all parts, the inject process would be equivalent to that of injecting the full model).
So, ummm, just drag and drop the folder XXX_work to inject_obj.bat, and the program will inject any part that it finds in the folder, to XXX.emo.
-------
(TODO: add part about extracting and injecting .emb, I will do that tomorrow)
--------
And that's all for now. What a wall of text.
Anyway, since at this point, the inject feature of emotool2 is probably very basic, I would need the collaboration of any graphics designer to continue developing it, since I totally suck at that.
Essentially I need people to test model edits injected with emotool2 and posting results (you should have followed the tutorial properly about importing/exporting .obj files in the editor programs, otherwise the results of tests would be useless).
And when possible, providing me models in both, the exported .obj that failed, and in the native format of blender/3ds max, so that I can experiment.


